Showing posts with label recipe. Show all posts

Wednesday, January 22, 2014

Recipe: Chicken and Broccoli Risotto

One of my favorite foods growing up was {and still is} creamy chicken and rice. We had lots of varieties of this whether baked, microwaved or made on the stovetop. All of them had Campbell's Cream of Something in them {celery, chicken, mushroom}.

Well, folks, what costs $1 in the US costs about $5 here {ok, not always, but imported things like Campbell's soup are expensive}! More than that, have you seen the ingredients on Campbell's soups? Lots of salt and unidentifiable things....gah!

So, when I saw this recipe on Pinterest, I was so excited! I always thought that risotto was a fancy, schmancy chef-y thing that would be too hard. Yet, Sweet C promised it was easy.

I'm delighted to say it WAS easy! It's a bit labor intensive {you cannot leave it}, but worth it. I do not have the faintest idea where to find Aborrio rice in Tianjin, and stock is more expensive than Campbell's soup, so I made some changes. Still, it's fabulous.

As Sweet C says, this is completely customizable. You can make it vegetarian, vegan, and add whatever you'd like. She uses green onions and peppers, but I've been on a broccoli kick lately, so I used that instead. And, even though I halved the recipe, I have enough for eat least two more meals. Win!


Ingredients:
1 boneless, skinless chicken breast, diced.
1/2 a red pepper, diced
1/2 yellow onion, minced
2 cloves garlic, minced
2 cups fresh broccoli florets
1 TBS olive oil
1 1/2 TBS butter
1 packet chicken bouillon
2 cups hot water
1 1/4 cups rice {I used regular white rice}
4 pinches paprika {I literally reached into my paprika bag and pinched 4 times}
Salt and Pepper to taste

Directions
In a tea kettle boil your water {if you're using actual stock, you can heat it in a sauce pan}.
Chop your chicken and veggies while the water is boiling.


Add the olive oil to your pot {I used a small dutch oven} and brown the chicken with some salt and pepper on medium heat.

When the chicken is browned on each side, add your veggies and let them saute until they're a bit soft.

Add the butter with the paprika and let it melt.


Now, add the rice and let it "toast" for a few minutes {because I cook with a hot plate, I used low-to-medium-low heat for the rest of the recipe}.


By this time, you should have mixed your hot water with your bouillon. Start adding this in small increments. Your consistency should be just a bit liquidy. When it starts getting too thick, add more liquid. I kept a 1/4 cup measuring cup and just spooned the broth into the pot when I needed too.

You should be stirring a LOT. I'd add the liquid and stir. Then put something into the fridge. Then stir. Then grab a sip of Peach Fanta. The stir. You get the point.

When you're done adding your liquid {should take about 20-25 minutes} test your rice for consistency. If you like it add salt and pepper to taste. If it's too hard for your preferences, continue to add water in the same way you were adding stock until you reach your desired consistency.

You know you have the right overall texture when you're rice isn't runny, but you can't mold it like you would cookie batter.

Serve this stuff warm and be prepared for some serious deliciousness.


YUM!

Tuesday, December 03, 2013

Recipe: Steamed Bread (Mantou)

I love bread. I really, really do. More than that, I love baking bread. But, in China, I definitely do not have an oven and despite peer pressure, I'm not going to buy one. I'm just not interested in spending money on a toaster oven that I'll own for maybe 9 months.

Luckily for me, in the northern part of China, Mantou, or Steamed Bread is very common. You can buy it at the grocery store or market, but often it's dry {reeeaaally dry}.  So, when I found this recipe on Yi Reservation I jumped on it.

I'm not gonna lie, I had a fun time in the grocery store buying flour {according to my co-teacher I actually bought bread flour} and yeast. I got a lot of use out of my translation app, that's for sure!

I'm not going to post step-by-step photos because Yi has done an excellent job of that. I am, however, going to post the recipe as I made it {he lists the ingredients in grams, and my process is slightly different because he used a bread machine and I did not} and show you the final product. As far as breads go, this recipe is fairly fool-proof and very easy.

Ingredients:
3ish cups of all-purpose or bread flour
1 TBS sugar
1 TBS instant yeast {I think dry-active would be fine, also}
1/2 tsp baking powder
1/4 cup lukewarm water
1 cup water
2 pinches of salt {maybe about 1/4 of a tsp}

Directions:
In a small bowl, combine sugar, yeast and 1/4 cup water.
Let sit for 5 minutes and let the mixture become frothy.
Meanwhile, measure out flour, baking powder and salt {I usually measure out 2.5 cups of flour and then knead in the rest}.
Mix in a bowl and, add water and yeast mixture {I use chopsticks for this}.
When you have a sticky dough, turn the dough onto a floured surface and knead until you have a smooth but not sticky ball {add flour bit by bit}.
Put in an oiled bowl covered with a damp towel and let the dough rise for around 45 minutes {it should have doubled}.
Punch down the dough and knead for around 5 minutes.
Divide the dough in half.
With one half, roll it into a log, then use a rolling pin to make a flat rectangle.
Brush the flat dough with water, then roll it width-wise {so, you'll have a long rolled piece of dough.
Cut it into pieces {I usually get about 6 out of a roll} and place in a steamer.
Let rise for 30 minutes-ish {don't forget the damp towel}.
Steam for 12-15 minutes.
Try not to eat them ALL at one time.


{My co-teacher helping me knead}
YUM.

The next project? Steamed cinnamon rolls!

What have you been making lately?

Saturday, July 27, 2013

Recipe: Squashed Tomatoes, Potatoes and Bacon

I love Jamie Oliver. Who doesn't, right? His recipes are simple, delicious and mostly healthy, and they are generally a staple in my recipe line-up. But, it does become difficult, at times, to find what you need when you live in China.

That is one reason that this is a go-to recipe for me. I had to adapt it quite alot. The original {which I have made before in the States} calls for finding chicken thighs {easy enough}, basalmic vinegar, etc. and then baking the whole thing. Not only do I not have an oven, but I also do not have the space to do  so many things at one time I can't really find the fresh herbs Jamie uses, and I definitely can't find multi-colored tomatoes or small potatoes all the time.

What I love about Jamie's recipes is that you can adapt the mess out of them, and they're still fabulous. So, this is just MY version. Try out some things, and see what works best for you. This recipe has always turned out well, no matter how many adaptations I've used.

Ingredients:
5-6 smallish-to-medium-sized potatoes {judge based on your frying pan}
A bunch of cherry tomatoes {or grape...it doesn't matter}
3-4 {or 5, or 6} slices of bacon {I've also used sausage, and it was delicious!}
2-3 cloves garlic
1/2 small onion, minced finely
Italian seasoning
olive oil
balsamic vinegar
salt and pepper

Directions:
Start the potatoes boiling in salted water until they can be pierced easily with a fork. Drain.
At the same time the potatoes are boiling, pierce the tomatoes with a knife {once each}. Cover with boiling water for a few minutes, then drain. Now, you can take the skins off {I've skipped this step before, but I like the flavors better with it. Its worth the extra work!}. Set aside.


In a frying pan with olive oil saute the onions until they're soft enough for you {I like mine caramelized}. Add the garlic and bacon and cook until done. Add the contents of the frying pan to the dish of skin-less tomatoes. Add a dash of balsamic vinegar and enough olive oil to coat things {1-2 TBS}.

Take the drained potatoes and smash {the potato should still be whole, just flattened a bit}, then place them in the frying pan.


Dump the tomato and bacon mixture on top. Cover and let simmer on low for a good long while. What you want is for most of the juice to evaporate and the tomatoes and vinegar to infuse the potatoes.


When most of the liquid is gone, take the lid off and let it cook long enough that the bottom gets brown and crusty {this is a personal preference of mine. You could just let most of the liquid evaporate}.
Serve as a meal!


Monday, April 22, 2013

Recipe: Thai Green Curry

My favorite thing I did in Thailand was to take a cooking class. It has encouraged me to do the same in China over the summer, and to really explore the flavors over here. It's also shown me that, really, it's not hard to cook authentic asian food. What you need, more than anything, is a little bit of knowledge.

This recipe is very easy, if not completely authentic. In Thailand I made this with a few different types of eggplant, chicken, kafir limes and fresh basil. Of course I can't find most of that here and nobody is eating chicken much these days.

The key is to find good coconut milk, and good curry paste. You can make the curry paste on your own {I'm going to try when I find a blender} but I have found that the pre-packaged paste is fairly serviceable.

Ingredients:
1-2 tablespoons of green curry paste
Approximately 1.5 - 2 cups of coconut milk
meat and vegetables {I used shrimp because I had it, peas, and red and yellow bell peppers}
1 teaspoon of sugar
1 tablespoon oil
1-2 teaspoons of Thai fish sauce {this is different from Chinese fish sauce}

Directions:
Heat a wok or skillet with oil inside.
When the pan is hot add the curry paste {if you make your own curry paste, it will have oil in it. No need to add extra} and saute for a few minutes until you can really smell the curry.
Add 1/4 of the coconut milk and stir the curry paste into it. 
Bring to a bubble for about 1 minute.
Add another 1/4 of the milk and repeat.
Add the remaining milk and repeat again.
Add your meat and let simmer in the curry paste until cooked.
Add your vegetables and cook until desired tenderness {I reversed this a bit, as shrimp cooks super fast and I like my vegetables pretty tender}.
Add fish sauce and sugar. 
Taste. If it's super spicy, you can add a bit more sugar.

Here are both pictures from the cooking class and from my own kitchen in Tianjin. 


Enjoy!

Monday, April 15, 2013

Recipe: Ground Beef Curry with Peas

Let me preface this post by saying that the next few recipe posts won't have pictures. I got lazy. I really did. However, the next few recipes are pretty basic ones, and adapted from any number of similar ones I found on the internet. Onward, then....

I love Indian food. Really, I love all food, but there is a special place in my heart for Indian-style cuisine. Certainly, this is NOT authentic. I live in China, know no-one from India, and am only just learning my way around Chinese spices and vegetables.

However, this recipe does use some spices common in Indo-China, and is adaptable to your own tastes {and of course your knowledge!}. The original recipe was posted by Beth at Budget Bytes. She added potatoes, broth, etc. and served over rice or in naan. I  have made it that way, and it is delicious. However, I like the idea of sort of making an Indian-style shepherd's pie and so I serve mine with standard mashed potatoes. If I were in the U.S. and had an oven, I would layer the peas, meat, and mashed potatoes in a Pyrex and then bake it to give the potatoes a crusty top.

Ingredients:
2 tablespoons olive oil
1/4 yellow onion, chopped finely
3-4 cloves garlic, minced
2 inches fresh ginger, grated
1.5 tablespoons curry powder
1 teaspoon turmeric
1 pinch crushed read pepper or cayenne
1 lb ground beef
frozen peas {eyeball is}
salt + pepper to taste

Directions:
Heat olive oil in pan and saute onion with salt and pepper until soft.
Add ginger and garlic, saute for 2-3 minutes or until soft.
Add curry powder, turmeric, and red pepper flakes
Stir & cook 1-2 minutes more.
Add beef and cook until fully browned.
Stir in frozen peas and heat through.
Serve over mashed potatoes!

Monday, March 25, 2013

Recipe: Ground Pork and Red Lentil Soup

It's been awhile since I shared a good recipe, or any recipe at all. I've been eating outside of my apartment quite a lot. I work fairly late on weekdays {8:30pm}, I often don't feel like cooking when I get home, and it's actually cheaper to grab takeout for lunches at work {usually less than $3 for a portion that will feed me for two meals}.

Then, I realized that I had quite a few odds and ends left in my pantry: red lentils, pork, fennel seeds. What better way to use these than in a soup? I love lentil soup because you can, quite literally, do anything you want with them and the result will be fabulous.

I used this recipe from The Whole Kitchen for inspiration, but used what I had on hand and could easily find {note: no parmesan cheese rind, roasted red peppers, or sausage}. The result was, predictably, delicious. I invited a few of  my girlfriends over to share the massive pot this made, and they both not only downed their bowls, but also demanded the recipe.

If I were in the States, I'd use Italian sausage and skip the fennel and extra Italian seasoning. However, giving the effect of sausage with the seasonings worked just as well.

Ingredients
1 lbish ground pork
2-3 stalks chopped celery
2 chili peppers, chopped {note: you can use bell peppers. The peppers I get here are very similar to Hatch chilies in the U.S.}
1 carrot, chopped
1 small yellow onion, chopped
5 cloves of garlic, minced
cayenne pepper, to taste
italian seasoning to taste
1 T fennel seeds
1 T red wine vinegar
1 cup white wine
1 can chopped tomatoes
1 1/3 cups red lentils, picked over and rinsed
olive oil
chicken bouillon if desired

Directions
In some olive oil, saute the ground pork with fennel, italian seasoning, salt and pepper.
When the meat is cooked, removed from the pot and set aside.
Add a bit more oil and saute onions, carrots, celery, and peppers until soft.
Add garlic, and cayenne to taste.
Saute one more minute and add more italian seasoning, vinegar, wine, lentils and tomatoes.
Add water to cover everything and simmer until the lentils are soft {30-45 minutes}.
Taste halfway through and add bouillon, salt, etc. if desired
Serve, freeze, and eat the leftovers!


Tuesday, December 04, 2012

Chinese Style Coca Cola Chicken

One the very best things about where I work, aside from it being one of my favorite companies, is that there are not many foreigners. The staff are almost all Chinese and they're all quite generous with letting us sample their meals {most of which they've either made, their moms have made, or they've bought from somewhere awesome that I would never know to go to}. One day, a co-worker named Lucy offered me some chicken saying it was Coca-Cola chicken. It. Was. So. Good.

So, I did what I always do when I taste something delicious and thought, "I can make that."

And then I Googled it. As it turns out, this is a common dish here, and many Chinese think of it as a an authentic Chinese one {note, almost everywhere has a Coca-Cola chicken. I think I've seen recipes with ketchup at home?}. But, you won't find it in a restaurant here, or in the states. It's home cookin'.

My recipe is about as authentic as you would consider any adaptation. I looked up a bunch of recipes by people who live here {expats married to Chinese folks, usually, or the rare Chinese person who speaks English AND has a blog} to get the gist and then just used what I had around.

The finished product was SO yummy. The picture you'll see of the finished product is served with mashed potatoes, but that's really only because I was craving some. I usually just eat this with sticky rice.

As always, I'm a "dash of that, a little of this" kind of cook, so experiment with your preferences.

Ingredients:
10 chicken wings and drumsticks {here, they're little. So, maybe a few less if you're in the States}
1 bottle of Coca-Cola
Light Soy Sauce
5 cloves of chopped garlic
oil {I used some sort of fish oil, I think. Peanut also works}

Directions:
Marinate chicken in about half the bottle of coke with soy sauce {about 2 TBS} for 20 minutes.
Heat the oil and saute the garlic for about 2 minutes.
Add the chicken {use loooong tongs} but not the marinade.
Saute until the sides are brown and crusty on the chicken.
Add soy sauce and coke to the pan.
Cook until the liquid reduces into a glaze of your desired consistency.

{When you add the Coke it will fizz. The fizz goes away!}

{This is what it looks like when it's glaze-y}


Seriously, this couldn't be easier. It uses ingredients that are easy to find anywhere, and doesn't require any kind of special equipment {I only have a hot plate in my apartment!}.


Enjoy!

Monday, April 16, 2012

(Mostly) Scratch-Made Matzo Ball Soup

Ever since I was a little girl, my father has told me how wonderful his grandmother's chicken soup was. To him, nothing compares. Nothing. Unfortunately, there's no recipe that anyone knows of. She had everything in her head and the recipe seems to have died with her.

Because was the middle of Passover when I wrote this post, I decided to make matzo ball soup. {If you have never had mazto ball soup...you must have some. Even if you don't make it, you need to high tail it to the nearest New York style deli and have a bowl. Seriously, it is the stuff of dreams}. What better time to try and duplicate my great-grandmother's recipe?

The Shiksa provided this recipe, which I basically copied as a starting point. The result? It smells INCREDIBLE while cooking {I might have mentioned this on Twitter a dozen times. Or so.} and the flavor is OK. I believe that is due to my error. I had a HUGE pot and added a LOT of water. I don't believe I compensated enough.

That being said, it was still freakin' good, and the matzo balls were to-die-for. The secret? I used a mix, I boiled them in the stock, and I let them boil for an hour. That gives you a dense, sinker matzo ball {as opposed to a light, floater matzo ball}.

The whole dish was DELICIOUS. 

Ingredients:

1 whole chicken (mine was about 3.5 pounds}
4 whole, peeled carrots cut into thirds
4 celery ribs, rinsed and cut into thirds {with leaves}
1 sweet onion cut into quarters {skin on}
5 springs of curly leafed parsley
1.5 tablespoons of dill {this is an estimate. I dumped into a WHOLE lotta dill}
6 whole cloves {remember, I had a BIG pot}
1 tablespoon whole black peppercorns
4 bay leaves
1 1/2 teaspoon of minced garlic
1 box of matzo ball mix {I used Maniscewitz}
4 eggs
4 tablespoons vegetable oil

Directions:

Rinse chicken and place in large pot {tall stock pot works best}
Cover with water and bring to a boil on medium high heat.
As you boil, foamy schmaltz will float to the top of the water. Skim it and reserve it for the matzo balls.
Once you've skimmed the fat add vegetables and spices except the garlic, and reduce to medium heat.


Cover and let simmer for around 2 hours.
Turn off the stock and let it sit while you make the matzo balls.
Make them according to package directions, making sure to stir in the schmaltz {I subbed the schmaltz for one teaspoon of the oil}. Also, remember that they get WAY BIGGER in the broth.
Refrigerate mixture while you strain the soup.
To strain, I placed a colander over a second stock pot and poured the soup through.
These are the dregs from straining the pot

 Pull out the chicken and shred, and the vegetables and chop. Return to the broth.

Bring the broth back up to a simmer and add the garlic.
Add the matzo balls and let simmer for approximately an hour {the box will say 20 minutes. Don't listen}.

Serve the soup with matzo balls, shredded chicken, and veggies.


Enjoy the yumminess!

Wednesday, March 07, 2012

Recipe: Garlicky Shrimp with Kale and Quinoa

I haven't had the opportunity to cook in awhile. I'm sure you've noticed {big thanks to Diana and Earl-Leigh for filling in that gap} the absence of recipes.

Finally {FINALLY!}, I was able to cook again. The 'rents were at bowling night {side story: they met in a bowling league, and have been in one since then. How CUTE is that?} and I was left to fend for myself. Muahahaha!

I've been kind of obsessed with Quinoa lately. I'm such a rice/pasta/couscous girl, and eating those foods in large quantities just don't fit into my weight-loss goals. So, I went searching for some delicious quinoa recipes that use it as a meal base.

I found this recipe in Pinterest, but it originally comes from Dishing Up Delights, and let me just say: YUM. Very good. Not the cheapest meal in the world {the red quinoa was about $3/pound and the shrimp about $5/pound} but not ridiculously so, and it's healthy. You can feel great about eating large quantities of quinoa and kale. Alternatively, chicken, tofu, or extra veggies would also work very well in this dish.

I altered the recipe a smidge to accommodate my own cooking style, and my preference for un-wilted kale. Completely wilted greens are icky to me {no idea why}, so I switched a few steps to keep the kale crunchy-ish.

Ingredients:
1 cup red quinoa {brown is cheaper, and I don't think it will make a huge difference either way}
1.5 cups of water
2 cups of chopped kale {about half a small bunch}
1/2 pound of peeled and de-veined shrimp
1/2 cup of tomato sauce
Juice from 1/2 a lemon
2 tablespoons minced garlic {from a jar}
1 tablespoon butter
1 tablespoon olive oil
1 pinch {or more} of red pepper flakes
salt and pepper

Directions:
Combine salt, water, and quinoa, and bring to a boil in a saucepan.
Once it boils, reduce to a simmer until all of the water is absorbed.
Turn off the heat, cover, and let rest for 5 minutes. Then fluff with a fork.

For the shrimp, heat butter and oil in a saute pan until screamin' hot.
Add the garlic and let cook for a few minutes {don't let it burn!}
Add the shrimp and cook until it begins to look pink.
Add the tomato sauce and continue cooking until shrimp is fully pink.
Turn off the heat, then add the kale. The heat will slightly wilt it, but it will be crunchy.


Squeeze in lemon juice, and add crushed red pepper {if adding}.
Salt and pepper to taste.


Y'all enjoy! This makes fabulous leftovers!

Monday, February 20, 2012

Guest Post: Gnocchi and Cheese from Earl-Leigh

Hey everyone! Up today is Earl-Leigh. She's sharing a DELICIOUS looking gnocchi recipe {I die!}. Have fun, y'all:

Hey y'all {Lauren's note: love being friends with other southern bloggers}! I was psyched when Lauren invited me over for a guest post! My name is Earl and I blog over at Earl-Leigh Designs

I'm a southern wife, puppy mama and Etsy shop owner. My blog is about my life and likes. You'll find some sewing tutorials, random excerpts from my day to day, recipes and more. Today, I came armed with a recipe. A few weeks ago, I was scouring my favorite website (Pinterest) and came upon a recipe for gnocchi mac and cheese. Let me tell ya...I have never met a carb that I didn't like so I knew that I needed to give this recipe a shot. 

Gnocchi Mac and Cheese

1 pound of gnocchi ( I used sweet potato gnocchi)
2 tablespoons of butter
2 teaspoons of minced garlic
1 tablespoons of all-purpose (or wheat) flour
3/4 cup of milk
1 teaspoon of Dijon mustard
1/4 cup shredded Gruyere cheese
1/4 shredded fontina cheese
salt and white pepper to taste
1/3 Parmigiano-Reggaino
Basil leaves for garnish (optional) 

Preheat oven to 375 degrees. Prepare gnocchi according to package directions. Drain the gnocchi and place in a single layer in a 1 1/2 quart shallow baking dish. Be sure to spray the dish with nonstick cooking spray before. 

Melt the butter in a medium saucepan on medium heat. Stir in the garlic and cook for about 30 seconds.  Whisk in flour until the mixture thickens and bubbles, then whisk in the milk and mustard. Continue to whisk and cook until it thickens, about 3-5 minutes.

Combine Gruyere and fontina, add them to the mixture by the handful, stirring until the cheese melts before adding the next handful. Once all of the cheese is melted, add salt and pepper.

Pour sauce over the gnocchi and top with Parmigiano-Reggaino. Bake the gnocchi until they puff and the cheese is golden and bubbly (about 25 minutes). Let the gnocchi rest for five minutes before serving. Eat. 

The husband and I both really enjoyed this gourmet take on mac and cheese. It was really flavorful and done in less than one hour. What did we not like about this recipe? The price tag as it calls for THREE specialty cheeses and it didn't yield many portions. I would suggest this recipe for couples having a date night in or for someone who is entertaining. 

Thank you all for having me! It's been delightful. 

(Psst...Lauren. Will you please find out what type of conditioner Rapunzel uses while you're there? Ha!)

Photobucket

Well, I can *try* to find that out. But, I do know from past experience that those types of details tend to be TOP SECRET! But, I can promise a postcard and many pictures!

Thursday, January 26, 2012

Recipe: Baked Vegan Donuts with Maple Glaze

Y'all, I've been slacking off. I haven't been cooking, or baking, or anything really lately. I mean, I have, but nothing exciting enough to tell you about. Thank goodness Diana from Dianapantz is here to fill the gap! And with donuts!

hey everybody!
i am diana and wanted to drop by lauren's blog and share one of my favorite things ; vegan dessert ;)


see, a couple months ago, i splurged and bought myself a donut pan.
since then, i have been making donuts left & right!
i have a 'donut maniac' board on pinterest, and one of my 2012 goals is to make a donut a week [thats 52 donuts!!]

one of the great things about vegan desserts is that its not hard [or expensive!] to modify most recipes.
so, even if you arent vegan, keep reading, because i promise you these donuts and simple [and delish!]


baked vegan donuts with maple glaze
makes 6 large donuts // original recipe found here // vegan modifications made by me

you need : 
*1 1/4 cup whole wheat or all purpose flour [i use whole wheat]
*1/2 cup granulated sugar [i use turbinado sugar]
*1 1/4 teaspoon baking powder
*1/2 cup + 2 tablespoons almond milk [i use regular, unflavored]
*1 1/2 tablespoons vegan butter [i use earth balance] ; melted

how to do it : 
1) preheat over to 425* ; spray pan with nonstick spray
2) in a large bowl, sift together flour, sugar, baking powder // add nut/soy milk & veg butter & stir til just combined [DONT over-stir your batter!!]
3) scoop batter into piping bag, large ziplock bag with corner cut off OR just use a spoon and your fingers to fill donut pan.
4) fill each cup 1/3-1/2 full
5) bake 4-7 minutes until the top of the donuts spring back when touched
6) while donuts are cooling, make the frosting


how to make maple glaze : 

you need : 
*1 cup powdered sugar
*2 tablespoons nut/soy milk
*1- 1 1/2 teaspoons pure maple extract [we didnt have extract, so i actually used a bit of maple syrup]

how to do it : 
1) in a small bowl, stir everything together until powdered sugar is dissolved.
2) dip each donut in glaze, set on cookie sheet

*i love putting them in the fridge overnight & then heating them up in the morning ;)


enjoy.
and be sure to stop by the blog for tons of great [and healthy!] vegan recipes, diy projects and tips on sustainable/healthy living.

Thanks, Diana! I now want donuts and have to figure out when I have time to make them! YUUUUM!

Also, don't forget about my *thankyou* giveaway going on RIGHT NOW and ending Saturday. Squee!

Thursday, December 15, 2011

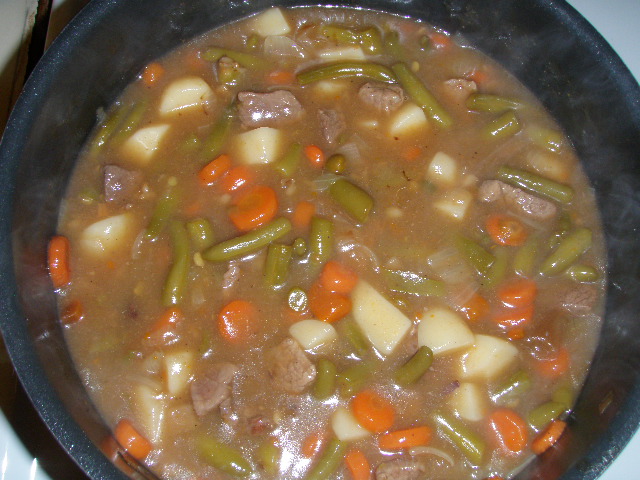
Recipe: Nanny's Beef Stew

This is another of those old family favorites that would just not be my style if it weren't an old family favorite. I usually prefer fresh vegetables, and sauteed garlic. But, this just wouldn't be the same with those things. And really, who couldn't use a quick, delicious meal that just warms you through in the winter?

Ingredients:
1 lb stew meat, cubed
2 cans diced potatoes
1 can sliced carrots
2 cans cut green beans
1 can vegetable soup in beef broth
1 medium onion, sliced, chopped, whatever
cornstarch
water
salt & pepper
vegetable oil

Directions:
Heat pot with vegetable oil, around 1 tablespoon
Add onions and sautee until translucent
Add stew meat, salt & pepper.


When meat is mostly brown add vegetables and soup.
Add enough water to cover and simmer until meat is tender.
Taste for seasoning and add more salt and pepper if needed.


Combine cornstarch with water adding small amounts of water until cornstarch has consistency of cream.
Bring stew to a boil and stirring quickly add cornstarch mixture.
Turn heat down and let simmer for 1-2 minutes to continue thickening.


Serve and enjoy!

Monday, December 12, 2011

Recipe: Brioche Dinner Rolls

Have I told you how dangerous bookstores are for me?


Source: etsy.com via Lauren on Pinterest


This is completely true. About a month ago I found myself in B&N in the cookbook section. Bad idea, friends. I walked around with around 5 books until I got realistic and put most of them back. Except this one:


Source: barnesandnoble.com via Lauren on Pinterest


And in that book, there is a recipe: Brioche Dinner Rolls. 


Can you say yum?! These are similar to the Challah I make. This is an eggy dough with three rises. However, the crust is a bit flakier, and the inside a bit lighter. Indulgent and decadent if I ever saw it. I will warn you: this is a fairly arduous process and I have no idea how to knead butter into a dough without a stand mixer. But, the results are well worth it.

Ingredients:
1 package active dry yeast
1/3 cup warm 2% milk
3 1/2 cups all-purpose flour
1/3 cup of sugar
1/2 teaspoon of salt
4 large eggs
6 1/2 teaspoons of softened, unsalted butter + 2 tablespoons butter, melted
1 tablespoon water
1 large egg white
cooking spray


Directions: 
Dissolve yeast and sugar in warm water for for 5 minutes.
Add salt, eggs, and slowly add flour.
Stir until you can't comfortably stir any longer and turn out onto a floured surface.
Continue adding flour by kneading until dough is smooth and elastic.
Continue to knead for 5 minutes.
Add butter kneading {first half, than the next half} until fully incorporated {I used a stand mixer with a dough hook for this}
Knead for approximately 4 minutes until dough is elastic and smooth {again!}
Place dough in a large, greased bowl and place in a warm location to rise {I turn on my oven to warm, then turn it off}
Let rise 1 hour or until doubled in size.
Punch down dough and then form into a ball.
Cover dough and refrigerate for 8 hours or overnight.
Uncover the dough and let stand for 1 to 1 1/2 hours {bring back to room temperature}
Divide into 24 equal pieces {I made 4 sections, then cut into 6} and roll each piece into a ball.
Place rolls in muffin tins, cover and let rise for 45 minutes or until almost doubled in size.


Preheat oven to 350 degrees.
Uncover rolls and brush with egg-white and water mixture.
Bake for 14 minutes or until golden.
Brush with melted butter and serve! 


Yum!
 

Thursday, November 24, 2011

Recipe: Pumpkin Spice Muffins

Yes, I know I've tagged this as a Thanksgiving recipe.

Yes, I know that you all had a lot going on for Thanksgiving and your OWN recipes to handle{potentially along with small children, your in-laws, and that weird cousin you have to watch. like. a hawk}.

BUT. If I have learned one thing, it is I always forget about breakfast on Thanksgiving Day. Did you know that if you don't eat breakfast you're more likely to overeat? I personally hate doing that because then I'm *miserable* all day. Much better to eat less and then have kick-ass leftovers, no?


So, here's a quick, easy, pumpkin muffin recipe to get everyone going. Bonus? You can probably use this for dessert too. Aaaand, it only requires on bowl, one measuring cup, a muffin tin, and a spoon. Yay for less dishes.

I basically copied this pumpkin muffin recipe from Smitten Kitchen {heart her!} with a few minor changes. According to the comments, these are pretty hard to mess up.

Ingredients:
1 1/2 cups whole wheat flour
1 cup + 1 tablespoon sugar
1 teaspoon baking powder
1/2 teaspoon baking soda
1 1/2 teaspoons pumpkin pie spice*
1/2 teaspoon salt
1 teaspoon cinnamon
2 eggs
1/3 cup oil
1 can pumpkin puree {NOT pumpkin pie filling}
non-stick spray

Directions: 
Combine dry ingredients in a large bowl except for 1 tablespoon of sugar and the cinnamon.
Beat eggs with oil {I just did this in the measuring cup}.
Add to dry ingredients along with pumpkin puree.
Stir until just combined.


Spoon into muffin tin sprayed with non-stick spray.


Combine remaining sugar and cinnamon and sprinkle on top of muffins.

Bake at 350 degrees for 20-30 minutes.


Let cool!


Enjoy!